Sunday, August 12, 2012
Overnight Steel Cut Oatmeal (with an unexpected surprise!)
We are working on overhauling our breakfast....be looking for more on that in an upcoming post. Last night I decided to get a jump on this mornings breakfast by preparing oatmeal in the crock pot. I have done this before (see Peaches N Cream Crock Pot Oatmeal) but this was my first time using steel cut oats. Can I just do a quick plug for steel cut oats? First off, they are a better choice nutritionally as they have not been processed like old fashioned oats and therefore retain more of their nutrients (not to mention more of their flavor and texture) as well as taking longer to digest which means you stay full longer. Plus, when I bought them from the bulk bins they were the same cost per pound as old fashioned or quick cooking oats but I only had to use half the amount of uncooked oatmeal in my recipe to get the same amount of servings. GO STEEL CUT OATMEAL!!
Okay, enough of my random enthusiasm for oats. Lets get on to the recipe (and the surprise). The recipe I used called for 2 cups of steel cut oats and 8 cups of water in a 5-6qt crock pot. I decided to add 1 cup of pureed beets and a grated apple for fun color and added nutrition. I wish I would have taken a picture of this because it was dark purple as I mixed it all up and put the lid on. I was excited as I woke up this morning (takes 7 yo 8 hours on low) to see what would be waiting for me when I lifted the lid and saw....oatmeal. Plain brown oatmeal. Didn't look purple at all!! I was so surprised. But I guess this is a benefit if you don't want picky eaters {or leery husbands} asking 20 questions about the color of their oatmeal. Here's what it looked like before I stirred it all up (oh, and for your own sake - make sure to spray your crock pot with cooking spray first. I ALWAYS forget this step so you can guess what I will be doing later this morning scrub, scrub, scrub).
And in the bowl (seriously, no purple at all - still shocked by that!):
And with some of our yummy toppings like walnuts, almonds, raspberries and bananas:
Surprise aside, this was a truly delicious breakfast and my belly is nice and satisfied. The kiddos liked theirs with some milk and a little brown sugar for a slightly sweeter taste. Hope you give this a whirl and enjoy it as well:) Let me know what wonderful, and possibly surprising, things you mix in.
Monday, August 6, 2012
The Not-So-Perfect Mom
It was one of those days. Nothing out of the ordinary happened. There was no hectic addition to our schedule. Actually, we didn't even go anywhere today or get out of our pajamas for that matter. Nonetheless, it was one of those days that as I was tucking the boys in for bed I found myself having to apologize for being such a grumpy mom.
I hate grumpy mom days! In my head I always see myself as a mom who is patient and loving and always makes time to listen to and play with her kids, never raising my voice. In reality, while I want to be that mom, there are days where I am far from it. I have talked before about being a Crabby Mom and my Mommy Meltdown (man, starting to notice a trend here...) and here I am once again needing to get it off my chest. While I know it is so perfectly normal to have these days, I still feel guilt when I let my emotions get the better of me. I could list the excuses - it's extra hot today, I have the cold that everyone else passed around first, husband has been working extra hours - but ultimately it doesn't mean anything. We all have stressors, we all have reasons to explain why we don't give our best. But they really don't matter.
So what does matter? I think how I chose to react once I realized the day I had created. By apologizing to my kids I took a negative and made it into the best positive I could. I showed them that we all make mistakes (even Mom...GASP!) and that the proper way to handle a mistake is to ask for forgiveness, right any wrongs, and make an effort not to make that mistake again. I also asked my sons to pray for me, demonstrating what it looks like to ask for prayer and giving specifics of what I needed prayer for. Of course being the amazing little people they are they automatically forgave me and were happy to pray with their mama. They are such awesome gifts!
While I may not be the perfect mom, I know that God can use me in my imperfection and so I try to embrace that on my not-so-good days. And then I get up tomorrow and try to do better than I did today. That's really all any of us can do. Hope you can relate to this and maybe even share what it looks like on your not so great days. One of the things I love most in times like this is getting to draw from other moms who get it and are able to not only relate but provide some wisdom. Feel free to do just that and while your at it, if you'd be so kind, maybe say a little prayer for me {and yourself if you are having one of those days} that God will help me wake up tomorrow with the proper perspective, a loving and patient heart for my children, and the desire to do better.
I hate grumpy mom days! In my head I always see myself as a mom who is patient and loving and always makes time to listen to and play with her kids, never raising my voice. In reality, while I want to be that mom, there are days where I am far from it. I have talked before about being a Crabby Mom and my Mommy Meltdown (man, starting to notice a trend here...) and here I am once again needing to get it off my chest. While I know it is so perfectly normal to have these days, I still feel guilt when I let my emotions get the better of me. I could list the excuses - it's extra hot today, I have the cold that everyone else passed around first, husband has been working extra hours - but ultimately it doesn't mean anything. We all have stressors, we all have reasons to explain why we don't give our best. But they really don't matter.
So what does matter? I think how I chose to react once I realized the day I had created. By apologizing to my kids I took a negative and made it into the best positive I could. I showed them that we all make mistakes (even Mom...GASP!) and that the proper way to handle a mistake is to ask for forgiveness, right any wrongs, and make an effort not to make that mistake again. I also asked my sons to pray for me, demonstrating what it looks like to ask for prayer and giving specifics of what I needed prayer for. Of course being the amazing little people they are they automatically forgave me and were happy to pray with their mama. They are such awesome gifts!
While I may not be the perfect mom, I know that God can use me in my imperfection and so I try to embrace that on my not-so-good days. And then I get up tomorrow and try to do better than I did today. That's really all any of us can do. Hope you can relate to this and maybe even share what it looks like on your not so great days. One of the things I love most in times like this is getting to draw from other moms who get it and are able to not only relate but provide some wisdom. Feel free to do just that and while your at it, if you'd be so kind, maybe say a little prayer for me {and yourself if you are having one of those days} that God will help me wake up tomorrow with the proper perspective, a loving and patient heart for my children, and the desire to do better.
Saturday, August 4, 2012
Handmade Spiderman Birthday Invitations
My 5 year old will be turning 6 at the end of this month so I am busily trying to keep up on the planning of his Spiderman party so that I am not going crazy with last minute prep {who am I kidding...that will still happen}. Most years I have made an effort to hand make the kids' birthday invitations. Doesn't always happen but it is something I enjoy doing and because we keep the guest list family-only still, it isn't very time intensive. This year's Spiderman theme was pretty easy to turn into an invitation. Want to see the finished product?
Okay...not totally finished because I have to add the party info to the back but you get the gist. Let me walk you through this super easy Spiderman face. I did this free hand and if you know me you know that drawing is not one of my strong suits...my point being that if I can do this, so can you!
First Step: Trace and cut out a Spiderman shaped face. Like I said before, I did this free hand while looking at a picture online but you couldcheat do it the smart way and print off a picture to trace for more exact measurements.
Second Step: Add a spiderweb to the face. I did this with a black sharpie but you could easily use a puff pen for dimension or even glue and glitter for a sparkly touch.
Third Step: Create eye mask. This was done in three parts:
Fourth (and final) Step: Glue the mask to Spiderman's face. Easy as that!
Some other suggestions for this -
**This would make a great lunch box note for your little guy (or gal!) who loves Spiderman. Just write your note on the back and slip it into your kiddo's lunch box on a special day.
**Make this large sized out of poster board and play "Pin the mask on Spiderman" at your party.
**Use these as accents on your party banner.
Lots of possibilities!
I will be sharing more of my party prep as I go but in the meantime you can follow my Spiderman Party board on Pinterest to see where I am getting my inspiration.
Okay...not totally finished because I have to add the party info to the back but you get the gist. Let me walk you through this super easy Spiderman face. I did this free hand and if you know me you know that drawing is not one of my strong suits...my point being that if I can do this, so can you!
First Step: Trace and cut out a Spiderman shaped face. Like I said before, I did this free hand while looking at a picture online but you could
Second Step: Add a spiderweb to the face. I did this with a black sharpie but you could easily use a puff pen for dimension or even glue and glitter for a sparkly touch.
Third Step: Create eye mask. This was done in three parts:
| 1) Cut out black part of mask - here is where it would pay to print off something, as you can see my free hand skills at this step were pretty poor |
| 2) Use an X-acto knife to remove the part of the mask where the white will show through |
| 3) Glue a white strip of paper onto the back of the black mask |
Some other suggestions for this -
**This would make a great lunch box note for your little guy (or gal!) who loves Spiderman. Just write your note on the back and slip it into your kiddo's lunch box on a special day.
**Make this large sized out of poster board and play "Pin the mask on Spiderman" at your party.
**Use these as accents on your party banner.
Lots of possibilities!
I will be sharing more of my party prep as I go but in the meantime you can follow my Spiderman Party board on Pinterest to see where I am getting my inspiration.
Friday, August 3, 2012
See It, Pin It, Do It - Make Ahead Mixes
For some time now I have given up on buying prepackaged mixes and have just made my own from scratch. Okay, once in awhile I give in if there is a sale/coupon match-up I absolutely can't pass up. But for the most part I have taken to making my own because it truly is more cost-effective and also allows me to control what goes into my family's food. No preservatives here! Now I realize for a lot of people the convenience of the box can be the most appealing part of store bought products and is hard to pass up so I thought I would try some make-ahead mixes I have seen on Pinterest that would combine the convenience of having it all together with the benefit of making it yourself. Win win!
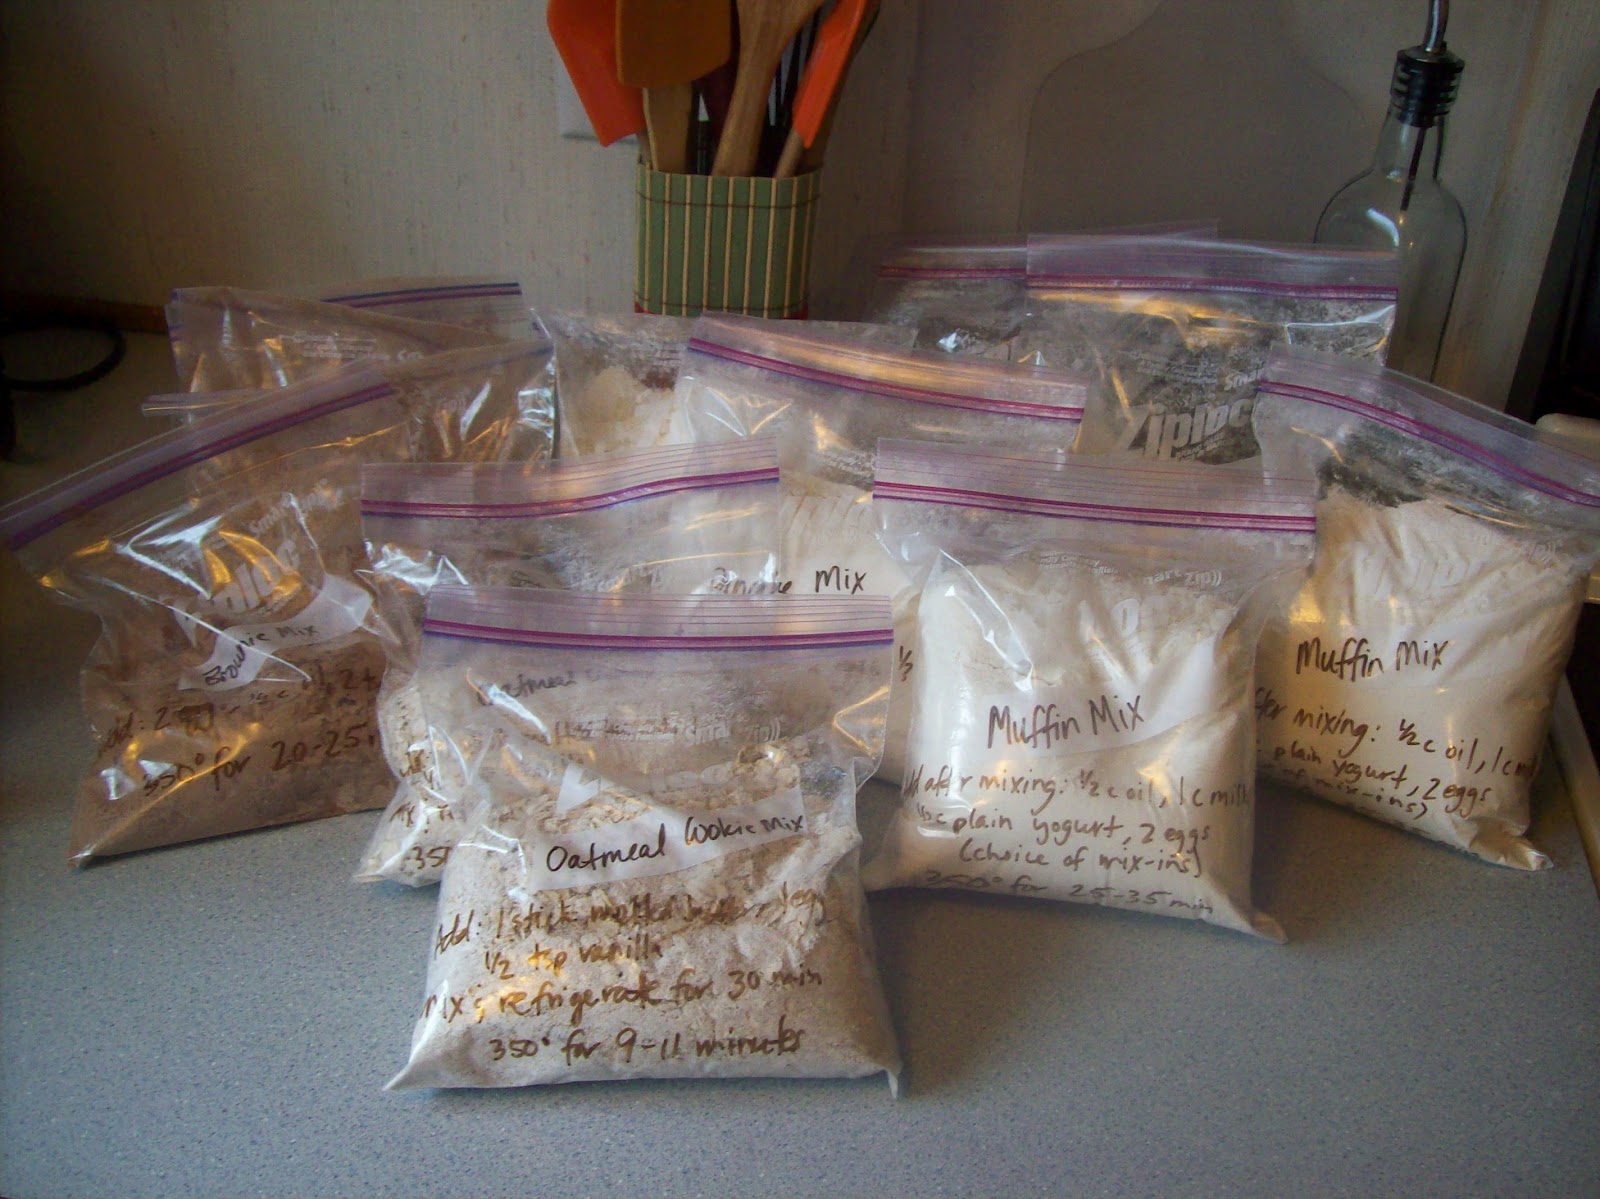
Now I did this on a whim with all items I already had on hand. You could obviously do a lot more with some planning ahead but here is a very basic make-ahead list to get you started. In a little over an hour I was able to make up all of these:
Pictured above are 4 brownie mixes, 2 oatmeal cookie mixes, 2 sugar cookie mixes, 2 pancake mixes and 2 muffin mixes. All of them with instructions for add ins and baking written right on the bag. Easy for those mornings I am in a rush but want to whip up something heartier for breakfast or those afternoons when my husband is feeling snacky and wants to prepare himself some brownies or cookies. Want to copy what I have done? Here is where I found all of my mixes (just click on each to go to find their instructions):
Fake Betty Crocker Brownie Mix from Fake-It Frugal
Fake Betty Crocker Cookie Mix from Fake-It Frugal (will find above pictured sugar and oatmeal cookie mix as well as chocolate chip and gingerbread cookie mix instructions)
Pancake Mix from good (CHEAP) eats
Muffin Mix from good (CHEAP) eats
I didn't get around to making this today, but I am also going to make up this huge batch of Cornbread Mix from Country Mama Cooks:
Let me share with you one final mix that isn't pictured but that I use on a regular basis and love, love, love. This is a recipe for homemade taco seasoning that will make you turn your back on that prepackaged version you would normally buy at the store. Trust me, this has great flavor and if you hit a spice sale, it will be cheap to make at home. I use this on everything from taco meat, to Mexican Meatloaf, to homemade burgers, and a zillion other things.
Homemade Taco Seasoning from $5 Dinners
Happy Mixing!!
Now I did this on a whim with all items I already had on hand. You could obviously do a lot more with some planning ahead but here is a very basic make-ahead list to get you started. In a little over an hour I was able to make up all of these:
Pictured above are 4 brownie mixes, 2 oatmeal cookie mixes, 2 sugar cookie mixes, 2 pancake mixes and 2 muffin mixes. All of them with instructions for add ins and baking written right on the bag. Easy for those mornings I am in a rush but want to whip up something heartier for breakfast or those afternoons when my husband is feeling snacky and wants to prepare himself some brownies or cookies. Want to copy what I have done? Here is where I found all of my mixes (just click on each to go to find their instructions):
Fake Betty Crocker Brownie Mix from Fake-It Frugal
Fake Betty Crocker Cookie Mix from Fake-It Frugal (will find above pictured sugar and oatmeal cookie mix as well as chocolate chip and gingerbread cookie mix instructions)
Pancake Mix from good (CHEAP) eats
Muffin Mix from good (CHEAP) eats
I didn't get around to making this today, but I am also going to make up this huge batch of Cornbread Mix from Country Mama Cooks:
![]() |
| ~picture belongs to Country Momma Cooks~ |
Homemade Taco Seasoning from $5 Dinners
Happy Mixing!!
Thursday, August 2, 2012
Frugal Family Night
We love family nights in this house. With 3 kids 5 and under we are limited to what we can do but we still like to take special opportunities to just bond with our kids over something fun that we can all enjoy. Most often family nights involve board games or movies, picnic dinner or take out, and sometimes staying up a little later then usual. It doesn't always involve spending money but it is nice to include special treats from time to time. This can add up if done regularly so I always try to keep my eye out for deals that revolve around what we like to do.
Today I spotted a great deal on pizza (we love to indulge about once a month and sprawl out in front of a movie together:) at Papa John's - now through August 12th you can use promo code SUMMER50 to receive 50% off anything at regular menu price. That goes towards your entire order! Whether you want one pizza or 10, bread sticks or pop, you can get it all at half price as long as it isn't already on special. Pretty great deal!
Speaking of Redbox, make sure you go under your account and sign-up to receive email and/or text alerts for deals. Each month you will receive a code for a free rental and occasionally you will receive extra deals. If you haven't reserved online before, you get a free rental after your first reservation. Today we go a promo code to try out Madagascar 3 the video game for free. Our kids are young enough that they don't ever get to play the video game systems alone and it is just something we do as a family at this point so whenever we get a chance, the kids see it as quite a treat. I am sure this game will be lots of fun for us all (thanks Redbox)!
That is tonight's Frugal Family Night plans. What does your family like to do together? What ways do you cut cost when entertaining your brood? Love to hear your thoughts!
Today I spotted a great deal on pizza (we love to indulge about once a month and sprawl out in front of a movie together:) at Papa John's - now through August 12th you can use promo code SUMMER50 to receive 50% off anything at regular menu price. That goes towards your entire order! Whether you want one pizza or 10, bread sticks or pop, you can get it all at half price as long as it isn't already on special. Pretty great deal!
We have a decent kid's movie selection and also a Netflix account so that is where most of our movies pull from. But there is always Redbox (lots of promo codes can be found online) and sometimes we hit the $5 bin at Walmart to stock up on some different movies. We did that this week and so tonight's feature is Flushed Away.
That is tonight's Frugal Family Night plans. What does your family like to do together? What ways do you cut cost when entertaining your brood? Love to hear your thoughts!
Thursday, July 26, 2012
Parmesan Garlic Broccoli Butter
A couple of years ago I found a Rachael Ray recipe for Green Goblin Bread that had a green butter made by adding spinach. Perfect for Halloween and my family really enjoyed it. We don't hide veggies from our kids but I love getting that extra boost of nutrition any way we can so I am always looking to add extra vegetables into our meals. So this week as I was deciding what to do with the veggies I had on hand, I decided to try this same butter concept but with broccoli.
I am going to share the exact recipe that I made...it seriously made a lot of butter so I would recommend cutting it in half. But if you decide to go full-bore, I will also share a couple of different ways we used the butter in this week's meals.
I started by chopping up 2 small heads of broccoli (the one pictured plus a slightly smaller one) and put the pieces into the food processor. Now I did this with raw broccoli which left the butter both smelling and tasting pretty strongly of broccoli. If you want a more subtle taste, maybe try steaming the broccoli first. Pulse up your broccoli until it is in teeny tiny bits:
From there I just added the rest of the ingredients on top of the broccoli - 2 sticks of butter (softened), 2 cloves of garlic (put them in raw but you could roast them first if you prefer that flavor), 1/2 cup grated Parmesan. Give it a good whirl until everything is nicely blended. Then you are ready to use it or cover and store it in the refrigerator.
Want some ideas how to use this? Here's what we had it on (all these pictures are before they were cooked, so hard to snap that after picture when trying to get dinner on the table for 4 hungry guys!):
I am sure you can come up with a dozen more creative ways to use this butter. If you try it out, let me know how it turns out! Enjoy~
I am going to share the exact recipe that I made...it seriously made a lot of butter so I would recommend cutting it in half. But if you decide to go full-bore, I will also share a couple of different ways we used the butter in this week's meals.
I started by chopping up 2 small heads of broccoli (the one pictured plus a slightly smaller one) and put the pieces into the food processor. Now I did this with raw broccoli which left the butter both smelling and tasting pretty strongly of broccoli. If you want a more subtle taste, maybe try steaming the broccoli first. Pulse up your broccoli until it is in teeny tiny bits:
From there I just added the rest of the ingredients on top of the broccoli - 2 sticks of butter (softened), 2 cloves of garlic (put them in raw but you could roast them first if you prefer that flavor), 1/2 cup grated Parmesan. Give it a good whirl until everything is nicely blended. Then you are ready to use it or cover and store it in the refrigerator.
Want some ideas how to use this? Here's what we had it on (all these pictures are before they were cooked, so hard to snap that after picture when trying to get dinner on the table for 4 hungry guys!):
| Spread on homemade french bread slices and warmed in the oven |
| Cut up some potatoes for homestyle fries, melted the butter and tossed the potatoes in the butter before cooking at 425 degrees for 25-30 minutes (this was my favorite!) |
| Hobo fish packets...if you do this, spread the butter on the fish first. It all melted and left a glob of broccolit bits on top of the zucchini.
|
Thursday, July 19, 2012
See It, Pin It, Do It - Deep Cleaning
Now that I have planned out some family activities to make the most of our summer, I wanted to focus on doing some of the projects that are on my wish list {aka my Pinterest boards}. So I am creating a post series called See It, Pin It, Do It (cook it, create it, clean it...whatever is relevant) that will be inspired by the things I am pinning on Pinterest. Some will be copied exactly from the original idea and others will be inspired with my own twist on them. I will always link to the original blogger so that you can see the true inspiration and so that credit is given where due when possible. Hope that you will be inspired to Do It too!
I had planned to make my first post in this series a cute Family Rules project but I started it and it got tucked away so we are going to start off with some cleaning pins instead. Maybe not all that exciting but definitely practical and let's face it, as boring as they can be, practical posts have to happen too. So let's get down to business - I am going to show you 3 cleaning tips I pinned and then tested for myself.
I started with this post by One Good Thing on how to clean your top-load washing machine (she has a link for front-load instructions as well). Does it drive anyone else crazy to have to clean the appliances that are supposed to be cleaning stuff for you? It irks me everytime I think about it...but I digress. The truth is I don't know the last time I cleaned my washing machine so it was actually pretty grimy. No judging - I am doing this for you all so I am trusting you will turn a blind eye to the grossness. Capiche??
Since the washing machine project involved a lot of waiting time, I decided to tackle two other projects while I was at it. This pin came from Practically Functional and was actually something I have done in the past but wanted to pin for continued reference in the future. This is about as easy as it gets involving simply water and vinegar heated in a bowl for 5 minutes which helps loosen the gunk making it easier to wipe clean. The vinegar also helps with any smells that are lingering. If the vinegar smell bothers you, just add some lemon juice to the mixture. Again, the microwave while frequently used is rarely cleaned like it should be so this was a much needed project. Ready for the results?
I should just have entitled this post Projects Chrystal has Neglected for Far Too Long. My last project tackled today was no exception - the vents above the stove. Ick. Double Ick. This again came from One Good Thing (let me urge you to browse her site while you are there - tons of great tips!). When I pinned this particular tip I was excited about the idea of simply having to boil the vents with some baking soda to remove the grease. Unfortunately I didn't have a pot wide enough to do this so after reading some of the comments from her readers I got the idea to just do it in my sink. I filled it part way with warm water, put some baking soda on the vent and let it sit while I boiled some water on my stove top. I splashed a little vinegar over the baking soda to make it work it's magic (and this helps from getting a stale smell when you air dry something like this) and then poured the boiling water over the top of the vent. I used a scrub brush to really work the grease off and then did the other side. Repeated this with the second vent and then put them out in the sun to dry. A little more work than her method but came out super clean.
I would say these were all successes, wouldn't you? Makes me excited to try out some more of those pins I have been storing up...even the cleaning ones. In the meantime if you want to see which cleaning tips are catching my eye, you can follow my DIY Cleaning Board.
I had planned to make my first post in this series a cute Family Rules project but I started it and it got tucked away so we are going to start off with some cleaning pins instead. Maybe not all that exciting but definitely practical and let's face it, as boring as they can be, practical posts have to happen too. So let's get down to business - I am going to show you 3 cleaning tips I pinned and then tested for myself.
I started with this post by One Good Thing on how to clean your top-load washing machine (she has a link for front-load instructions as well). Does it drive anyone else crazy to have to clean the appliances that are supposed to be cleaning stuff for you? It irks me everytime I think about it...but I digress. The truth is I don't know the last time I cleaned my washing machine so it was actually pretty grimy. No judging - I am doing this for you all so I am trusting you will turn a blind eye to the grossness. Capiche??
Click on the link above for exact instructions but the basics of this involves running two different loads, one with bleach and one with vinegar. The good news is that when all was said and done the inside of my washing machine was sparkling and looked like this:
I will say that I had to do a little scrubbing on the inside after the final rinse. There was a ring around the tub of the basin where the water had sat and there was still residue on the agitator but I used my handy dandy Magic Eraser and that was all gone in no time. To be fair, I think the problem had more to do with the fact that I didn't really have enough hot water for the vinegar load because our hot water tank needs to be drained (hard water build-up). Either way, I ended up with a clean washing machine so I am happy!Since the washing machine project involved a lot of waiting time, I decided to tackle two other projects while I was at it. This pin came from Practically Functional and was actually something I have done in the past but wanted to pin for continued reference in the future. This is about as easy as it gets involving simply water and vinegar heated in a bowl for 5 minutes which helps loosen the gunk making it easier to wipe clean. The vinegar also helps with any smells that are lingering. If the vinegar smell bothers you, just add some lemon juice to the mixture. Again, the microwave while frequently used is rarely cleaned like it should be so this was a much needed project. Ready for the results?
I should just have entitled this post Projects Chrystal has Neglected for Far Too Long. My last project tackled today was no exception - the vents above the stove. Ick. Double Ick. This again came from One Good Thing (let me urge you to browse her site while you are there - tons of great tips!). When I pinned this particular tip I was excited about the idea of simply having to boil the vents with some baking soda to remove the grease. Unfortunately I didn't have a pot wide enough to do this so after reading some of the comments from her readers I got the idea to just do it in my sink. I filled it part way with warm water, put some baking soda on the vent and let it sit while I boiled some water on my stove top. I splashed a little vinegar over the baking soda to make it work it's magic (and this helps from getting a stale smell when you air dry something like this) and then poured the boiling water over the top of the vent. I used a scrub brush to really work the grease off and then did the other side. Repeated this with the second vent and then put them out in the sun to dry. A little more work than her method but came out super clean.
I would say these were all successes, wouldn't you? Makes me excited to try out some more of those pins I have been storing up...even the cleaning ones. In the meantime if you want to see which cleaning tips are catching my eye, you can follow my DIY Cleaning Board.
Subscribe to:
Posts (Atom)